Folding Chair Makeover

IMG_3595

While looking for houses to buy a few years ago, Señor and I fell in love with our current home. It was a foreclosure that a group of house flippers bought, gutted, and remodeled. I love everything about the house (the yard definitely needs some work though. Seriously). One of my favorite parts is the sunroom. During the summer, it’s perfect for entertaining friends. When the weather changes and fall sneaks up on us, I love to sit on the porch with some tea and the windows open. It’s just perfect.

Here’s the thing: we don’t have any seating. Well, we have a futon, but not everyone wants to cuddle on that disgusting old thing. So, I recently added “seating for sunroom” to my garage sale list. Surprisingly, I found some chairs within a week. For all 3 chairs in their glorious splendor, we paid $7 (total). Maybe a little overpriced, but I wanted them reaaaal baaayyud.

$7 total at a garage sale

$7 total at a garage sale

They’re ugly. It’s true. All goldish and weird yellow. It’s too much. But not to worry. This type of chair is ridiculously easy to fix up. I found this idea on- imagine this- Pinterest. Go figure!

Here’s what we did:

1. First, we removed the screws in the back

Tools. Gotta have 'em.

Tools. Gotta have ’em.

Remove the screws. Keep them in a safe place until you're ready to put everything back together.

Remove the screws. Keep them in a safe place until you’re ready to put everything back together.

Ugh. So. Ugly.

Ugh. So. Ugly.

2. We Señor spray painted every metal part of the chair

We chose an oil-rubbed bronze spray paint by Rust-Oleum.

We chose an oil-rubbed bronze spray paint by Rust-Oleum.

3. While the chairs dried overnight, we wrapped this fresh, cute fabric around the seat and back padding of the chair. You can find scrap fabrics at garage sales or head to a fabric store (which is what I did because I was too lazy to wait. This fabric cost me $6). Using a heavy-duty staple gun, staple the fabric to padding.

Make sure to pull it tight!

Make sure to pull it tight! Also, again with the weird hands. Where did they come from??

Staple guns are your friend.

Staple guns are your friend.

Dainty.

Dainty.

4. Once the chairs have dried, screw the paddings back onto the chair.

So much better

So much better

Yep.

Yep.

If you’re really cool, you could also:

  • Stencil a design on the metal part of the chair
  • Use a vinyl tablecloth as fabric to make the chairs weatherproof
  • Use different, coordinating fabrics and paint colors

The total cost for the chairs runs as follows:

Chairs: $7

Fabric: $6

Spray Paint: $10

Total cost: $23 or $7.67 per chair (Used a calculator this time, thankyaverymuch). Not bad for some additional seating for our jam* sessions.

*Our good friends are teaching us guitar. So when I say *jam,* I really mean that I clumsily “follow” along and occasionally hit the G-chord. It ain’t pretty.

IMG_3579

Tongues.

Tongues.

Time Savers

The day of mourning is upon us: Today is officially the last day of summer for Sr. and me.

“Whaaat?!?! How can this be?” you ask. Great question. I have no idea. I am heartbroken.

Not really. But it is a little sad. I will miss the puppies immensely and will have to let go of my addiction to 1) Netflix, 2) Sleeping until 8 am (ok, 10), and, of course, 3) Thursday garage sales and endless projects.

Don’t get me wrong. I’ll still do all these things. But the weekend will become my happy thought.

This year, however, we’re changing a few of our routines to make week nights equally happy. That will require a little flexibility and a *gasp* a little work on the weekend. But we got this. Here’s what we’re changing in our lives so that we’re not working for the weekend.

IMG_3533

1. Cooking and freezing meals for the week on Sunday

I love to cook, however I detest cleaning up afterward. Ahhh. Needless to say, after coming home from my exhilarating exhausting job, I don’t always feel like cooking. But we gotta eat and a girl can only eat so much takeout/cereal. Last year, we would cook about 3 times a week, eating leftovers or with family members (and occasionally eating out) on the other nights. That means we spent at least 3 of our week nights preparing meals and cleaning up the kitchen after the tornado we finished cooking. Thankfully, I have a very helpful husband who enjoys to cook with me. But we would rather spend our evenings with the puppies. Or watching The Office. Or anything other than cleaning up. So, we devised a plan. We’re now preparing all of our weeknight meals on Sunday evening to either refrigerate or freeze for the rest of the week. Here’s how much time we’ll save:

Last year’s meal prep time:

1 dinner: Usually 30 minutes prep, 20 minutes clean up, plus the time is takes to eat. One night, Sr. seriously said to me after dinner: “Now that that’s out of the way…” Yeah. And I totally got him. Don’t judge.

So we’re looking at at least 50 minutes for one night. Multiply that times 3 and we end up with almost 3 hours (Hey, Jack: I don’t teach Math) spent during the week. This may not seem like much (because it’s not) but it’s more about the looming “Now I have to cook dinner and wash dishes and compost and fill the Brita and blah blah blah” that hangs over me every evening when I get home. I hate that feeling. Again- love to cook, but really, let’s be honest: I just love to eat. I need a personal chef.

Anyway, this week we made the following to refrigerate or freeze:

Mushroom, onion, cannellini, and quinoa salad (inspired from this recipe). We keep the quinoa in the fridge and then serve it on a bed of spring mix. Hahaha. Bed of spring mix. Sounds fancy, really it’s just lazy #boxedsalad #amiright

Delicious

Delicious

Whole wheat and spinach pasta with mushrooms and broccoli and a cauliflower sauce (inspired from this recipe)

It took us 1.5 hours to completely make and clean up from these meals. Now, I can come home and not have to worry about cooking. Such a relief. Seriously. Again, don’t judge.

We’ve also started making our own whole wheat bread. I got the recipe from this wonderful site, but modified it using a commenter’s suggestions for wheat bread (the original bread calls for white flour- which I love- but my hippy hips don’t).

Whole Wheat Homemade Bread

2 3/4 cups of whole wheat flour

2 cups water

1 3/4 t. salt

1/2 t. yeast (it really doesn’t matter what type- if you get the “Active” kind, it mentions mixing with warm water and what not- disregard this. Jut mix the yeast right on in!)

Add flour, salt, and yeast to a large bowl and mix until combined. Add in water. Mix until it looks rather disgusting and there’s no more extra flour left on the bowl. Completely cover with plastic wrap and store on your counter for 12-18 hours (overnight is great!).

Here's what your bread will look like after 12-18 hours of rising.

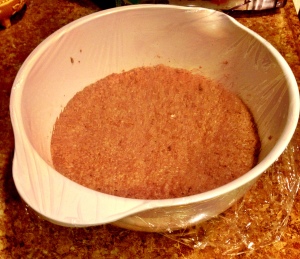
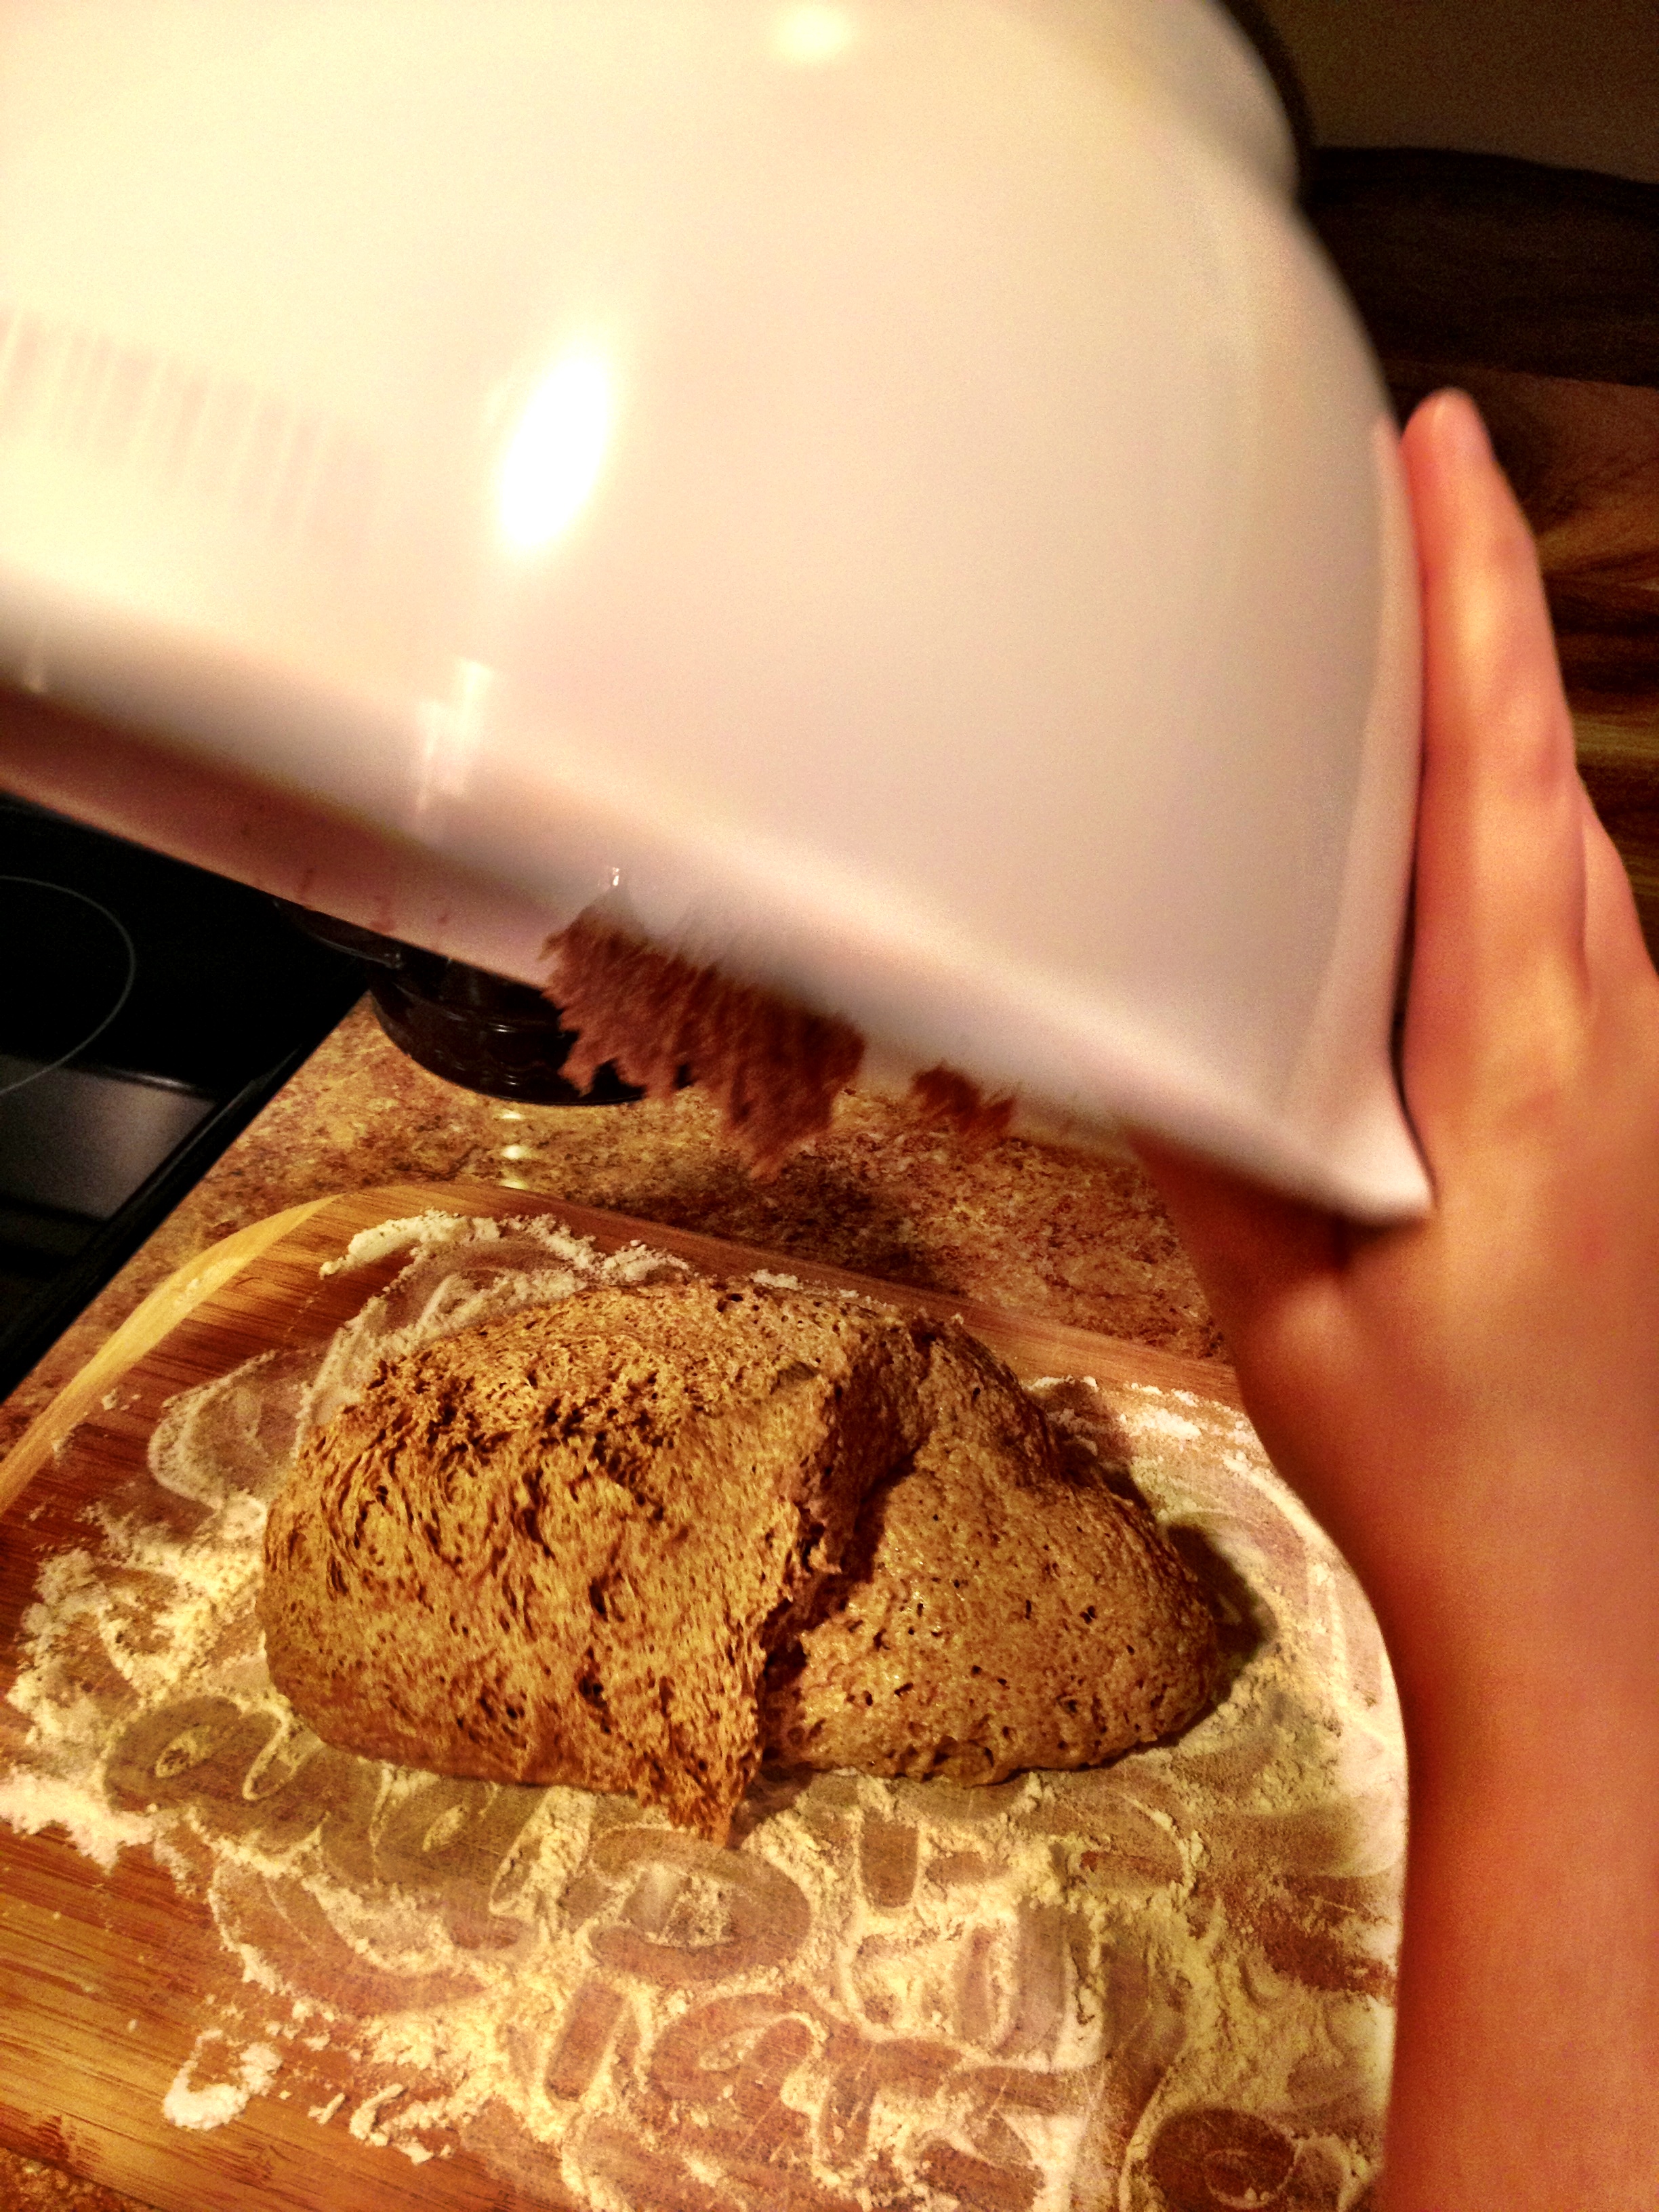
Here’s what your bread will look like after 12-18 hours of rising.

When you’re ready to cook, preheat your oven to 450 degrees. Once preheated, place your cast iron pot in the oven for 30 minutes to heat up. While the pot is heating up, pour your bread mixture (which has now significantly risen) onto a well floured surface. With flour on your hands, shape the bread mixture as pictured below. Once your pot is preheated, place the bread into the pot- do NOT grease the pot. It will not stick. Promise. Cook the bread for 30 minutes. After 30 minutes, remove the lid and cook for an additional 10 minutes. Enjoy. It’s delicious.

Gross. But sooo good when cooked. Sr. ate some of it raw. That really was gross.

Gross. But sooo good when cooked. Sr. ate some of it raw. That really was gross.

Remember! Don't grease your pot! It doesn't need any oil/spray/butter.

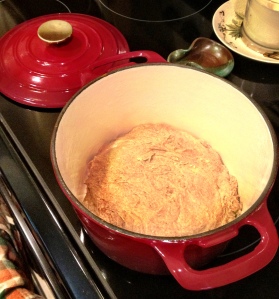
Remember! Don’t grease your pot! It doesn’t need any oil/spray/butter.

So. Amazing.

So. Amazing.

Yep. And it cost less than $1 to make and lasts for a week.

Yep. And it cost less than $1 to make and lasts for a week.

2. Meal planning/grocery shopping

Since we’ve been married, Sr. and I have planned our meals and done ALL of our grocery shopping on Sundays. I kinda HATE going to the grocery store (really, spending money), so we try and buy everything we’ll need on that one trip per week. It takes a few minutes to plan out the meals, but it’s not too bad. I made a super long list of meal ideas a while back and I always use my Pinterest “Main Dish” board for inspiration. The excellent thing about doing all the meal planning and shopping in one day? We save money. We don’t buy extra things. Awesome.

3. Preparing puppy breakfasts the night before

This saves maybe 1 minute, but whatever. If you’re like us, you need EVERY DANG MINUTE in the morning to make it to work on time. We saved old salad dressing jars and use them as puppy food “measuring cups.” Each night at puppy dinner time, Sr. fills up the jars (one for Finley and one for Riley) so that they’re ready to be poured into bowls the next morning. This saves a sleepy Sr. from having to measure it out of the dog food containers each morning when time is like a gem- super precious.

4. Cleaning schedule

I tried this last year and failed. Lame. It’s going to work through this year because it just is. Because we’re going to be amazing. Duh. So we’ve designated certain days for certain chores. Here’s the list we currently have agreed upon:

Every day before hitting the sack: All dishes washed and away, sweep, straighten rooms

Monday: Bathrooms

Tuesday: Dust

Wednesday: Mop floors, vacuum

Thursday: Clothes laundry

Friday: Linens laundry

Saturday: Yard work and swing day*

Sunday: Food prep for the week, mail organizer 

*Swing day chores alternate each week of the month. I got the idea from swing days from this awesome cleaning post. Here’s what our swing days will look like:

1st week: Wipe out pantry, fridge, and freezer

2nd week: Clean inside windows

3rd week: Clean baseboards

4th week: Sweep and de-spiderweb (yep. that’s a word) porches (Ummm…that may be a husband job….)

What do you do during the work week to save time? Seriously- gimme some ideas!

DIY Bar from Baby Changing Table

Hello. Sorry it’s been awhile. My life has exploded in the last few weeks as 1) I realize I have less than 1 week until I return to work (crying) and 2) my master’s program is getting really fun (tedious).

Anyway, I’ve been collecting all sorts of goodies to create and fix up, but have not had the time 😦

In the meanwhile, check out the awesome DIY project my fabulous sister and her boyfriend created:

DIY Bar from Baby Changing Table

I found this changing table at a garage sale with my friend M for $30. I knew it would be the perfect height for a bar and Kitten Sorceress (sis) thought so, too.

Baby changing table: $30. Excuse M's arm in the picture :-) She stood next to it so we could show the height of the piece.

Baby changing table: $30. Excuse M’s arm in the picture 🙂 She stood next to it so we could show the height of the piece.

To begin, one of the “rails,” for lack of a better word, was removed. You could remove all of them, of course. Whatever you prefer.

Next, paint the table using a primer. This will make your piece look SO much better! Believe me, I’ve done it without a primer before and it’s just not the same. If you’re really super amazing, do two coats of primer. Even better. It’s okay if it looks sloppy- you’re just covering the piece. Sis used a small roller for the large, flat areas and a brush for the hard to reach places and corners.

Changing table with primer

Changing table with primer

Once the primer has dried, you can begin painting with whatever paint you chose. Now. You must be patient. Some pieces may take a few coats. You have to be willing to wait! If you’re like me, you may sometimes get it in your head that YOU HAVE TO HAVE IT RIGHT NOW. Yeah, not gonna work for this type of project. If you want it to look amazing, go ahead and accept that this will be a weekend project. Primer on Friday, 2 coats on Saturday, another coat on Sunday…you get the picture.

IMG_3414

First coat

First coat

Final coat

Final coat

Since Kitten Sorceress and Boyfriend wanted a bar, they took out the drawers (PROJECT IDEA! Use the drawers for storage under your bed).

They also added a shelf to create additional storage space. To add a custom shelf to your piece, first measure the depth and width of your piece. If you have extra wood lying around because you’re so cool, use it. If not, head to your local home improvement store (shameless plug for Georgia favorite, Home Depot) and have them cut the board to the correct size. Next, prime and paint the shelf. Finally, attach the shelf using any sort of brackets you have/can pick up. They got their’s from IKEA for $1.50 (total).

Custom shelf- wood cut from Home Depot

Custom shelf- wood cut from Home Depot

Brackets from IKEA: $0.50 a piece

Brackets from IKEA: $0.50 a piece

I seriously LOVE how it turned out- they did an awesome job!

Perfect

Perfect

Before and After

Before and After

-Baby changing table – $30

-Primer –  $10

-Black paint – $8

-Shelf – $10

-Brackets- $1.50

-Brushes- previously purchased for other DIY projects

Total cost: roughly $60

Yeah!

Awesome job, Kitten Sorceress and Boyfriend. You guys are the best.

Wanna know why else they’re the best? On their bar, they also have the following great garage sale/antique finds:

– Jack Daniels glass mugs: 4 for $1

– Wine rack (spray painted blue with previously purchased spray paint): $3

-Braves pitcher: $3

Kitten Sorceress wanted everyone to note, however, that the Dom Pérignon is NOT from a garage sale. That would be quite the sale!

Also, puppies say hi.

Hi.

Hi.

Spotting the perfect DIY/Upcyle Project

Being crafty sounds great, right? I read some blogs and am utterly disgusted (in a good way) by the cute, crafty, insane projects people create. How do they find the time? Where did they get that idea? Can I be them?

I love projects, but I’ll admit to you- most of my ideas come from Pinterest. I see something I like, put the items I need on my Garage Sale list, and eventually put it together (usually with the help of Sr., the husband).

That leads me to today’s post: How do you spot the perfect DIY/upcycle project? (thank you, Kitten Sorceress, for the idea)

Easy schmeasy, guys. 3 things to keep in mind: knowledge, quality, and price.

1. Knowledge– if you’re like me and you’re not Martha Stewart, you need to do some research online. I’ve said it a trillion times now, but I’ll say it again: Pinterest. It’s honestly overwhelming how many ideas there are on this website. Using the Pinterest search bar, do separate searches for the following: “DIY,” “upcycle,” “home décor,” and “crafts.” Your search should yield numerous ideas that you may like to recreate. Seriously- you have to know what you want. Just wondering around an estate sale may not be fruitful for you. If you come prepared, however, with knowledge of what you want to create, you may actually find what you’re looking for.

2. Quality– Don’t buy it if it’s not a quality piece. Say you’re looking for a dresser. It can be ugly. It can have a hideous paint job. It can even have horrendous knobs. It should not, however, be broken, falling apart, rotting, or sprouting anything. It needs to be a good, quality piece, like the dresser we found in my parent’s basement. Made in the 70’s, this dresser is solid wood. I know because I tried to carry it. What? Yeah. Anyway, it’s not perfect by any means, but it was free and we needed a dresser. Before, it looked something like this (THIS IS NOT ACTUALLY THE DRESSER. I didn’t take a before picture because I’m dumb.)

Same color and similar style as the dresser we actually painted.

Same color and similar style as the dresser we actually painted.

So we painted it and spray painted the brass knobs. Total cost: $15 for paint, spray paint, and some cute drawer liners.

photo (16)

photo (14)

photo (15)

Here’s a tip: it helps to have another person with you when you’re on the hunt for certain items. You may see an item you’re looking for and think to yourself, “that’s the perfect hat rack I’ve been looking for!” Thankfully, you brought a friend who will**hopefully** intervene and point out that 2 of the knobs are missing and it’s leaning drastically to the left. Friends are good (a.k.a. quality assurance).

3. Price– Consider the item you’re making. Imagine how much it would cost in the store. If you’re coming anywhere close to that price at a garage sale, you’re spending too much. It’s a garage sale! Even an estate sale (which can be more expensive, depending on the business hosting the sale) should be willing to offer a decent price. If they’re not, then that’s when you walk away. Part of the thrill of upcyling or making your own whatever is knowing that you saved a buck. You may have to muster some super human patience, but you can do it.

Are you planning any DIY/upcycle projects? Here’s what I’m working on finding/creating:

Wine Caddy

Mirror

Folding Chairs (I actually bought the chairs at a sale recently…now just looking for the right fabric)

Pat on the back. So. Cute.

Just because it’s cute: this picture of Riley patting Finley on the back. So encouraging.

Why estate sales are your new best friend

photo (12)

I have a love/hate relationship with estate sales. Sometimes, they’re incredible. For example, I bought these adorable Norman Rockwell pictures for $1 a piece at an estate sale.

Norman Rockwell pictures= $1

Norman Rockwell pictures= $1

And this adorable, handmade casserole holder for $0.50.

Precious handmade casserole holder. The sweet lady who was downsizing her home made this and it's just perfect. $0.25

Precious handmade casserole holder. The sweet lady who was downsizing her home made this and it’s just perfect.

But occasionally, I’ll come to an estate sale where I seriously. cannot. understand. your. life. I don’t mean the people that acquired all the stuff and for whatever reason (it’s not always death) are now selling their stuff. I mean the businesses that run the estate sale. I mean, I guess it is a business and they are trying to make money. But still. I saw an awesome piece of pottery at an estate sale recently. Guess how much?? $120. Like seriously?!?

Now, I’m not saying it wasn’t once worth $120 or even more. It was perfectly crafted and so beautiful. BUUUUUT. This is an estate sale where you’re literally trying to get rid of everything in the house. It ain’t happenin.

So, I get strangely excited about estate sales. Will it be a good one? Expensive? Horrendous? No one can know. Unless you’re awesome. Here’s how to be awesome:

  1. Go to www.estatesales.net
  2. Search your area and make a list of all the estate sales you could possibly go to this weekend (or whenever you have time). MAKE SURE TO WRITE DOWN THE NAME OF THE COMPANY THAT IS HOLDING THE SALE! I’ll get to that later.
  3. Go to them! Have fun! Preferably, choose sales that are relatively close by so you can go on Thursday (usually the 1st day) and again on Saturday (usually the last day). Many companies will sell everything for 50% on Saturday. You may be asking- well why don’t I just go on Saturday?? Keep reading. I’ll tell ya.
  4. After your weekend of exploring different sales, critique the businesses. Ask yourself the following:
    1. Were their prices reasonable the first day? The last day?
    2. Were they willing to bundle (offer you a deal if you bought a lot of stuff)?
    3. How was the customer service?

You’ll notice certain estate sale businesses are worth attending, and others are not. Don’t waste time at the ones you know won’t deliver. I will not be attending any estate sales by the business with the $120 pottery NOR will I attend one held by the business that was terribly rude to M and me one time.

Here’s what I suggest as far as when to go: If you have the luxury, go on Thursday (usually the first day). You can scope out what they have and if you see something you really love, go ahead and buy it. If you can wait, however, until Saturday (usually the last day), you may be able to get half off or some awesome bundle deals. Beware though! If you wait until Saturday, you may miss something perfectly wonderful. It’s risky, I know.

I recently went to an awesome estate sale (put on by my favorite business). Since it’s summer (Only 16 days left for teacherfolk in this area. I will not cry, I will not cry…), Sr. and I were able to go on Thursday and again on Saturday. Check  out the awesome goodies we discovered:

$4 at estate sale

$4 at estate sale

This is a horrific fabric piece of art (?) with ducks (?). It's 3 feet by 4 feet and is just awful. The sheets on top of it cost $0.50 a piece. I'm working on redoing this...post coming soon :-)

This is an awful fabric piece of art (?) with geese (?). It’s 3 feet by 4 feet and is just awful, but it only cost $1 and has a wooden frame that is perfect for reusing. The sheets on top of it cost $0.50 a piece. I’m working on redoing this for my sister’s new apartment…post coming soon 🙂

Old wooden ladder, $10

Old wooden ladder, $10

I am sooo excited about this project :-)

I am sooo excited about this project 🙂

I’m thinking something like this for the wooden ladder. Thoughts?

3 containers, filled with goodies. Each container/cooler cost $2

3 containers, filled with goodies. Each container cost $2

Our spoils

Our spoils. Details below.

100 file folders= $0.25

4 books for my middle schoolers= $4

4 rulers= $1

100 assorted cards/envelopes= $1.25

Box of 30 tubes of watercolor and paint brushes for good friends= $5

Watering can= $3

Milk glass vase= $0.50

Rusted cheese grater (for project, not grating cheese. Not trying to kill myself)= $0.50

Bag of kid scissors= $0.75

Helmet= $4

Not pictured:

Sabre saw= $15

Extension cord= $4

Heavy-duty measuring tape= $4

I didn’t buy these, but here’s a look at some of the other things we could have bought at this sale, just to give you an idea of how awesome these sales are!

Each pot was $1 or less.

Each pot was $1 or less.

One of the tables displaying their glassware

One of the tables displaying their glassware, all reasonably priced.

One of the boxes of picture frames. All frames $1

One of the boxes of picture frames. All frames $1

Rolling desk=$35

Roll top desk=$35. Would be perfect for painting and finishing.

Do you have any treasures from estate sales? Do share. 

Also…

This is just cute. Nothing to do with estate sales.

This is just cute. Nothing to do with estate sales.

Piggy back ride. Again, not related to estate sales at all.

Piggy back ride. Again, not related to estate sales at all.